Archivo | Main courses RSS feed for this section

Morcilla´s burger: from the original recipe posted by Gastronoming

5 Sep
Todos los derechos reservados por Tras La Receta

All rights reserved by Tras La Receta

Some time ago I read a recipe of blood sausage burger that I fall in love with. I cooked it up as soon as I could, and today a present here an adaptation from the original that you can see HERE. My own proposal consist in a burger with blood sausage (Morcilla de Burgos) and boiled rice seasoned with extra onion and garlic, plus a touch of cumin, coriander and black pepper, instead of mincemeat. The effect was smoothing out the unctuous blood sausage´s texture and flavor.

I substituted the apple chips, certainly delicious, by a lettuce salad with tomato, onion, bacon and apple. Instead of Cheddar cheese (that is more commonly use for burgers) I chose Havarti cheese this once. At cooking moment I preferred to bake the burgers instead frying them, because in this way I avoided breaking them. If you prepare this burgers you´ll see the texture is a bit different from a meat one, but with a little care you won´t have any problem.

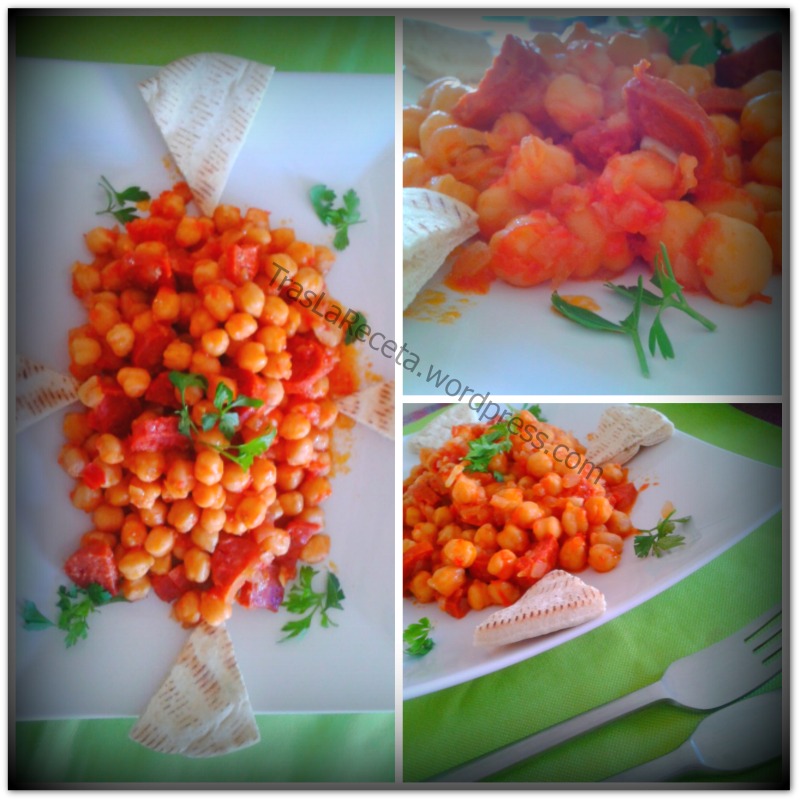
We are only two persons at home and we cook up morcilla´s burgers for six, so we could enjoy them in the classical way with the always yummy bread, but also I presented them like «tapas» (traditional Spanish appetizers) with a very cool beer. I have many ideas fluttering into my head since this blood sausage burgers gave me the light. I´ll share them as well later or earlier :). Now, let´s start with our Morcilla´s burguer.

All rights reserved by Tras La Receta

All rights reserved by Tras La Receta

Ingredients:

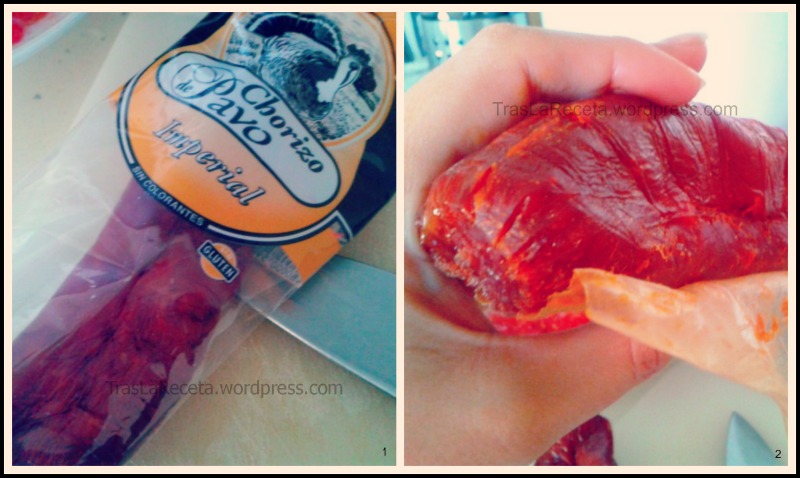
2 morcillas de Burgos (traditional blood sausage made with rice, from Burgos, Spain)

1/2 cup non boiled rice or 1 1/2 cup boiled rice (middle grain rice)

2 1/2 onions

2 crushed garlic cloves

1/2 tsp cumin

1/2 tsp ground coriander

1/2 tbsp parsley finely cut

black pepper

salt

2 tbsp extra virgin olive oil

1 egg yolk

4 tbsp breadcrumbs   


How to prepare Morcilla´s burguer

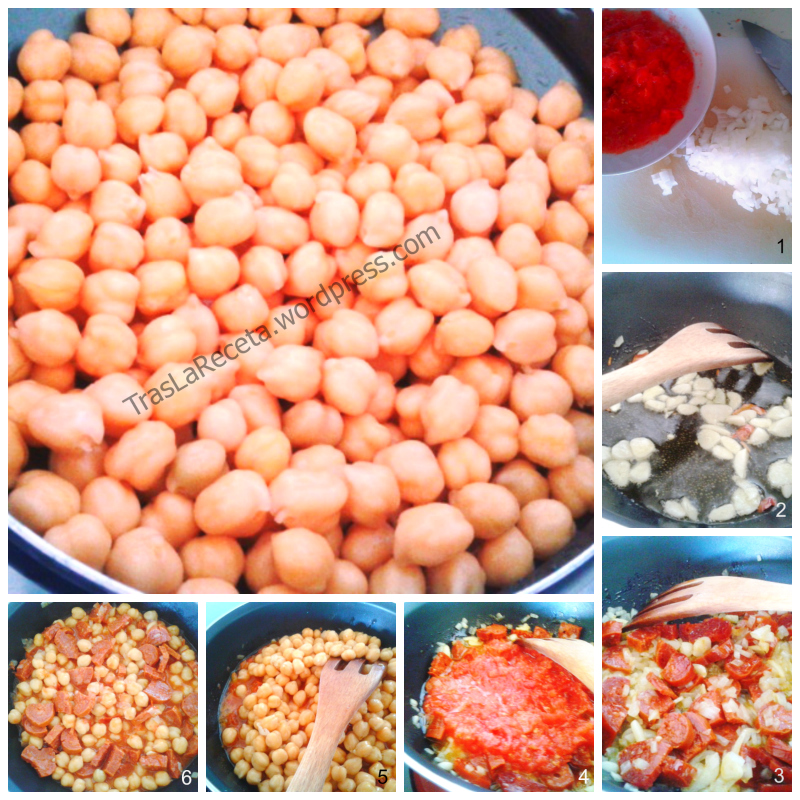
  1. In first place, cook the rice but do not wash it and put a little more of water than you usually use in order to get a creamier rice.
  2. Put the olive oil into a pan, heat and add the mashed garlic and the onion half with a pinch of salt.
  3. Once the onion transparences removed from the heat. Add the cooked rice, stir very well, check the salt and let it cools.
  4.   Remove the morcilla skin, put their meat into a bowl and proceed to break them completely until you get a morcilla´s mince. Then add the rice and the rest of seasons: cumin, coriander, parsley and pepper. Mix very weel. Now incorporate the egg yolk and the breadcrumbs and stir once more very well.
  5. It is time for giving form the burgers. Here you will see how I do it, although it´s a different recipe the proceeding is the same from number 4 point.
  6. Put the burgers into a lightly greased oven dish and bake 180 Celsius degrees during 10 to 12 minutes.
  7. Take it out, let refresh and serve the burger in the classical way with bread, mayonnaise and caramelized onion or in the way you prefer.

Notes: At moment of saving the burgers before cook them put between them some baking paper in order to avoid they paste each other and break them later. Keep them into the fridge while you´re patiently cooking the caramelized onion. How? Cut the onion into finely julienne or finely rings.  I did it with a sharp knife but I cried a whole river. It seems a lot of cut onion but you´ll see, at the end, the amount makes us laughing.

Put the onion into a pan with three olive oil tablespoon and a pinch of salt and let it cook very slowly during one hour. It seems an eternity but it worth it. You don´t need add sugar contrary it´s use to think, just cook it softly and without hurry and onion will be able to make explode all its sweetness.

Choose an appropriate palette spoon to take out the burger from the oven dish in order to not break them. If they lost their form a little, never mind, give they form again over the bread or dish. Simply a cheerful experience for taste. Thanks a lot Gastronoming for sharing your recipe :).

Patatas revolconas, Spanish recipe

2 Sep
Todos los derechos reservados por Tras La Receta

All rights reserved by Tras La Receta

No matter where they´re from, Extremadura, Ávila or Salamanca, the «patatas revolconas» are one of those traditional Spanish recipes that when you try them, you will always want enjoy over and over. Despite its humble origin (it was food of Castilian peasants) it is a recipe that with just a very few things, basically potatoes, paprika and some meat product, the result surprise us because of their texture and flavor´s delicious combination.

The recipe, that has jumped from the Spanish countryside to bars, cafeterias and restaurants, in towns and cities, it has became popular and evolved. Although the ingredients that they add can be different, bacon, chorizo and «torreznos» as the most common of all, this recipe´s base is always the same: boiled potatoes they become pure, seasoned with paprika and enriched with some of the products I mentioned before. This is the reason of the names it acquires: patatas meneás, patatas revueltas or revolconas.

Todos los derechos reservados por Tras La Receta

All rights reserved by Tras La Receta

Ingredients:

6-8 potatoes

1/2 large traditional spicy chorizo

6 slices of bacon

1 garlic clove finally cut

1 tsp sweet paprika (Pimentón de La Vera)

1 tbsp extra virgin olive oil + 1 more optional

salt

parsley to decorate

How to prepare Patatas revolconas (4 persons)

  1. Peel the potatoes and put them into boiling water with salt. Let them cook very well until they broken if you prick them.
  2. Fry the chorizo and bacon into a pan. Once fried, take them out and put aside. Saute the garlic into the oil liberated by the chorizo and bacon. Put olive oil if it were necessary. Once the garlic golden (take care it doesn´t burn) take the pan out of the heat, add the Pimentón de La Vera and stir.
  3. Now back to very low heat, incorporate the potatoes to the pan and squash them until you get mashed potatoes, but let some pieces of potatoes. Add some water of the boiled potatoes if it were necessary.
  4. Put the chorizo and bacon we had aside into the potatoes, stir and serve.

    All rights reserved by Tras La Receta

    All rights reserved by Tras La Receta

It´s a course that´s served hot usually on winter, but if there´s some warmth yet, let it refresh and accompanies with cold beer. As main course, starter or appetizer, it´s actually good in any time. Enjoy and, you know, if you decides to travel to Spain, to Extremadura, Avila or Salamanca, don´t let try this Patatas revolconas.

Pork with vegetables: Oriental style

27 Ago

It is already the last week of August and in order to cheer us nothing better than cooking some special recipe. No matter if our holidays end or start, I propose a wink to the Oriental cuisine with this Pork with vegetables, Oriental style. Here you´ll find a very easy recipe, with pictures step by step. You´ll be able to enjoy a complete main course, full of flavor and color, a homemade foreign menu where cereals, vegetables, meat, even fruit, are perfectly combined.

I can´t tell you a lot about this recipe, just it is the result of my interest and liking for the Asian gastronomy. After being experiencing with many other proposals, such as this Cerdo Agridulce (Sweet and sour pork), the Kofta Curry or the Mujaddara, these two last from the closer Middle East, I figured out this idea, cooked up with ingredients are available in any supermarket.  Would you like to eat some Asian course at home? Then, let´s go into the kitchen.

All rights reserved by Tras La Receta

All rights reserved by Tras La Receta

Ingredients

4-5 pork steaks

4-5 cabbage leaves

1 red bell pepper

1 large onion

2 garlic cloves

fresh ginger (grated tip)

1 handful pitted dates (6-7)

70 ml soy sauce (approximated amount)    

1 tbsp Maizena (cornmeal)

3 tbsp soft olive oil (or sunflower or soy oil)+ necessary amount for frying the meat

1 coup Basmati rice

pepper mix

salt

How to prepare Pork with vegetables, Oriental style

  1. At least 1/2 hour before starting the recipe, cut the meat into strips and put them into a glass container with the grated ginger and the soy sauce. Just the necessary amount to cover the meat. Cover with film and let marinating into the fridge.
    All rights reserved by Tras La Receta

    All rights reserved by Tras La Receta

    Todos los derechos reservados por Tras La Receta

    All rights reserved by Tras La Receta

  2.  Back into the kitchen, get the vegetables ready to use: cut the garlic into slices; the onion, the red bell pepper and the cabbage into julienne. Take a look to the process of the cabbage´s cut in the pictures are bellow. It is about making a roll or two rolls and cut them into slices.
    All rights reserved by Tras La Receta

    All rights reserved by Tras La Receta

    All rights reserved by Tras La Receta

    All rights reserved by Tras La Receta

  3. Heat the 3 oil tablespoons into a pan or wok. Add the garlic, the onion and the red bell pepper, season with the mix of pepper and a pinch of salt. Let cook for 5 minutes and after that add the dates cut into slices too, sauté and incorporate the cabbage.
  4. Ad a trickle of soy sauce, cover and let cook, middle heat, while we cook up the pork strips.

    Todos los derechos reservados por Tras La Receta

    All rights reserved by Tras La Receta

  5. Take the strips out of the container and put aside momentarily. Dissolve the cornmeal into the soy sauce where the meat was marinating, take the meat back into the same sauce now with cornmeal and stir in order to the strips absorb this sort of tempura.

    Todos los derechos reservados por Tras La Receta

    All rights reserved by Tras La Receta

  6. Take other pan and heat oil enough to fry the pork strips little by little (remove the tempura´s extra sauce). Once golden, take out the strips and put them aside over absorbent paper in order to avoid extra fats.

    Todos los derechos reservados por Tras La Receta

    All rights reserved by Tras La Receta

  7. Check the vegetables, they don´t have to be very soft, it´ll be better if they are al dente, especially the cabbage.
  8. Cook the rice, previously washed, into boiling water with salt. Let cook during 10 or 12 minutes and strain.
  9. Serve the rice, put a vegetable layer and over it put the pork strips.
    Todos los derechos reservados por Tras La Receta

    All rights reserved by Tras La Receta

    Todos los derechos reservados por Tras La Receta

    All rights reserved by Tras La Receta

If you don´t like dates, you can use toast or natural almonds that combines very well with this kind of courses. Also, you can substitute pork for beef if the meat is tender, because of this I recommend veal steak preferably. Then, nothing more, I hope you have fun this week, if it is not, at least, have fun cooking!;)

Chickpeas with chorizo: from the Spanish kitchen

20 Ago

One of the first traditional dishes I tried when I came to Spain was Chickpeas with chorizo. A friend cooked up for me the recipe and since that moment the chickpeas with chorizo earned a privileged place into my kitchen. I prepare them very often, with different kinds of chorizo that always give a distinctive touch to the chickpeas. Which of them tastier? Actually I don´t know. No matter if you choose a sweet chorizo, spicy chorizo, fresh or traditional. The variety makes the richness. Because of this, our today´s recipe is prepared with turkey´s chorizo, delicious as well.

One aspect doesn´t change, at least in the way I cook up this chickpeas: whatever chorizo I choose, the tomato always is natural and ripe, grated just at the moment I´m going to use it. Without any doubt, the difference between preparing the chickpeas in this way and cook them with industrial tomato sauce is clearly palpable. Another point is that the chickpeas, the way they are made in Spain, they are taken out after cooked and are drained. Then, they only take the grains in order to mix them with other ingredients. Because of this, you can use chickpeas already cooked or cook them yourselves in the way I explain later.

It is a very nutritious recipe, full of vegetables proteins, present in our chickpeas, and animal proteins as well in the chorizo. It is true that chickpeas need to be accompanied by pasta or rice in order to synthesize all amino they have and the organism need. For this reason I choose a low-sodium pita bread and the problem was settled. On this menu, onion and garlic strengthen the immune system; vitamins, minerals and lycopene present on tomatoes fight against cellular degeneration and cancer. So, it´s a healthy and tasty menu, isn´t it? Let´s get into the kitchen.

Todos los derechos reservados por Tras La Receta

All rights reserved by Tras La Receta

Ingredients

400 g cooked and drained chickpeas (or 250 g chickpeas if you are going to cook them)

200 g Spanish chorizo (I used Turkey´s chorizo)

 1 onion

3-4 ripe pear tomatoes

3 garlic cloves

1 tip of chilli (optional)

3 tbsp extra virgin olive oil

parsley to decorate

salt

How to prepare Chickpeas with chorizo

Todos los derechos reservados por Tras La Receta

All rights reserved by Tras La Receta

  1. If you are going to cook the chickpeas, leave one cup (250 g) to soak the night before. Cook them with salt, 1/2 tsp of cumin, one bay leaf and one entire non peel garlic head. Into the pressure cooker they are 20 minutes, count from the start of the pressure´s release. Into a regular pot they usually cook during 45 minutes to 1 hour, depending on the strength of the grains. Be careful because it is not necessary very soft chickpeas. Drain them, throw away the garlic and the bay leaf and put aside.
  2. If you buy cooked chickpeas, wash them with cold water, drain very well and put aside in the same way.
  3. Heat the olive oil into a pan or into a clay pot. Add the garlic, laminated (if you cook the chickpeas do not put garlic), add the tip of chilli as well and let them golden. Incorporate the onion finely cut before the garlic burn and season with a pinch of salt.
  4. When the onion transparence add the chorizo, peeled and cut into half moons. In order to peel the chorizo make a transversal cut and remove the skin with the tip of the knife.

    Todos los derechos reservados por Tras La Receta

    All rights reserved by Tras La Receta

  5. Sauté and add the tomato previously grated and seasoned with a bit of salt, stir to integrate everything.
  6. Finally, add the chickpeas well-drained, cover and let it cook 10 minutes. Two minutes before, uncover.

Ready! Serve them in little pot clays or individual dishes and decorate with parsley.

All rights reserved by Tras La Receta

All rights reserved by Tras La Receta

As you will be able to appreciate, they are better fried or sauté chickpeas than a chickpeas potage. Here in Spain, chickpeas and legumes in general are usually cooked in the way of the popular Cocido Madrileño (Madrid Stew). I have the commitment of cook up a Madrid Stew as soon as winter  permit this. Now, middle of August, no way. Impossible with the hot of the summer season in this part of the planet. For those people who read me in other latitudes, here you have this link.

The recipe I share today, you can prepare it for 4 people as well, by doubling the amounts. About bread, if you are not hypertensive, choose your favorite, but if you do are, enjoy the chickpeas with white rice. I hope you enjoy this recipe as much as I do every time I prepared it. It´s a very easy and fast recipe to make even in those days we want spend less time into the kitchen. See you soon!

Here you have others Spanish recipes if you want to have a look:

Salmorejo: Cordovan recipe

Spanish omelet with pizza flavor

BBQ chicken: Cuban recipe for pressure cooker

15 Ago

Today I want to share a barbecue chicken recipe, more or less in the way it is prepared in Cuba. It is usually cooked in the oven or into a pressure cooker as well.  This once I decided to prepare the recipe into the pressure cooker, a wonderful inventive and a great ally in order to save time inside our kitchens. This is a very easy recipe made in the own way the Cuban mothers and grandmothers cook up BBQ sauce

The BBQ chicken is prepared in many different ways, depending on where it´s prepares. It´s very popular in the U.S.A, and although the preparation´s common denominator is the sweet sauce and the way we marinate the chicken, it change a little according to the ingredients they chosen, even along the American territory.

The way I present it today is the way, more or less, it´s cook up in Cuba, but I´m sure there are a few versions more of the Cuban BBQ chicken, because in the Cuban gastronomy, the most of the recipes often carries a little bit of improvisation, sometimes adjustments that respond to the availability of one product or another.  Without any more delay, let´s prepare our today´s recipe.

All rights reserved by Tras La Receta

All rights reserved by Tras La Receta

Ingredients

2 chicken leg quarters

1 onion

4 garlic cloves

1/2 red bell pepper

1/2 yellow bell pepper (or green bell pepper)

juice of one orange

2 grated tomatoes (or 4 tbsp crushed tomato or tomato sauce)

4 tbsp mustard

 one generous splash soy sauce

1 tsp brown sugar

2 cup chicken broth

50 g salt butter

black pepper

salt

How to prepare BBQ chicken: pressure cooker´s Cuban recipe

  1. Remove the chicken skin, season to taste with salt and black pepper.
  2. Golden the chicken into the pressure cooker with 25 g of butter. Take the chicken out and put aside.
  3. Put down the heat, add the other 25 g of butter and stir-fry the garlic into slices, the onion and two kinds of bell pepper into cubes. Season. It is not necessary cut the vegetables into very fine pieces, because later we going to triturate them in order to get a thinner BBQ sauce.
  4. Add the tomato when the vegetables are cooked. If the tomato is natural let cooking during 8-10 minutes.
  5. Incorporate the mustard, the soy sauce, the chicken broth (just 1 cup and reserve the other), the orange juice and the brown sugar´s tea spoon. Let cook and reduce uncovered.
  6. Now add the two chicken pieces (if only there is very little liquid, then add more broth chicken until the pieces are covered), cover the pressure cooker, adjust the pressure valve in position number 2, increase the heat and when it start liberating pressure, down the heat and let it cook. Depending on the intensity of your pressure cooker, it will need more or less time. Mine´s very fast, so 12 minutes are enough time, counted from that it stars to whistle. Chicken cooks very fast into pressure cookers in general.
  7. Once the time has spent and the pressure has liberated, take the chicken out and let´s triturate the sauce. If it has been lot of liquid, strain the vegetables, triturate, and then incorporate the extra liquid, little by little, in order to get the desired density. The sauce should be light but not watered.

    Todos los derechos reservados por Tras La Receta

    Todos los derechos reservados por Tras La Receta

Serve the chicken, dress with sauce and put the rest into a sauceboat to try more. The sauce you don´t use save it very well covered into the fridge, for two or three days; frozen it as well and you will be able to keep it longer and then use it with other meats.

This recipe can be prepared into the oven as well. Proceed seasoning the chicken with salt and black pepper and cover the pieces with the same amount of butter before. Put them into a baking tin and sprinkle with orange juice. Cook for 30 to 45 minutes until golden. Prepare the sauce in the same way I explained before. Cook up the sauce slowly while the chicken is baking and finally triturate with help of a blender. That´s all, enjoy as we did at home.

Caesar salad: my own version, easy recipe

25 Jul

Since many years ago, Caesar Salad is not longer a local star dish and become international well-known recipe. It is said that it was created by an Italian man resident in Mexico, who gave the name in honor to Caesar Cardini, the restaurant´s owner where he used to work. Alex Cardini, same Caesar´s surname, maybe his brother, later traveled to Tijuana, in order to participate in a gastronomy contest and just there he won a prize with his salad, whose little secret was its dressing. They relate it was popular first in California and then it was extended; the truth is that today it has been completely revealed.

Another story claim that the recipe was created by Caesar Cardini himself, who operated restaurants in Mexico and United States as well. There was an occasion when a group of American pilots came to the restaurant asking for a simple salad; the problem was that, without tomatoes or other typical ingredients, Caesar took his mother´s recipe for scarcity times and at the end it was actually a success: the Aviator´s Salad.

Moreover, according to some memories of his daughter Rosa, died in 2003, the recipe was born on July 4th, 1924, when rush depleted the kitchen´s supplies and her father made it with what he had. Also, a number of Cardini’s staff have said that they invented the dish and to complete all the folklore about the Caesar Salad, the chef Julia Child, very well-known in America for having introduced the French cuisine to the public, said that she had eaten a Caesar salad at Cardini’s restaurant when she was a child in the 1920s. The earliest contemporary documentation of Caesar Salad is from a 1946, Los Angeles restaurant menu, twenty years after the 1924 origin stated by the Cardinis. So, no matter which the origin was, the certainty is that we can enjoy it today.

The salad served in the restaurants in those years, no matter its origin, contained Roman lettuce, coddled eggs, croutons, old cheese, vinegar, sugar, olive oil, some English sauce drops and lemon juice. Today I want to share an own version, more or less, with the original flavor of the Caesar Salad dressing.

All rights reserved by Tras La Receta

All rights reserved by Tras La Receta

Ingredients to prepare Caesar Salad (2 persons)

(version with 2 kinds of tomatoes and crabsticks)

 1 chicken breast 
 2 crustless bread slices 
 1 Roman lettuce 
 mix Batavia lettuce 
 50 gr old Parmesan cheese flakes (or your favorite old cheese) 
 1/2 julienne chive 
 4 diced crabsticks 
 1 red tomato cut into half moons 
 4 cherry tomatoes cut into 4 parts 
1/2 sweet corn can 
2 little anchovy fillets 
1/2 cup wine 
2 tbsp olive oil 
black pepper 
salt

Caesar Salad dressing:

70 ml olive oil

1 tbsp lemon juice

1 large egg

1/2 garlic clove

1 tbsp mustard

1 tbsp English sauce Lea & Perrins (optional)

2 little anchovy fillets

How to prepare Caesar Salad

  1. Cut the chicken breast into little strips. Seasoning with salt and black pepper to taste, add the wine, cover them and keep the recipient into the fridge whereas we prepare the other ingredients.
  2. Heat 2 tbsp olive oil into a pan and fry the bread until golden in order to get our homemade croutons.
  3. Into the same pan heat more olive if it is necessary and cook the chicken breast strips (keep aside the wine). When the strips are cook incorporate the wine we put aside, up the heat, leave the wine evaporates, stir and you´ll see how the chicken golden. Take them and put aside before they drying or they burn. Now let´s prepare the dressing.
  4. Put all the correspondent ingredients of the Caesar dressing into a glass beater. Do not add salt because the anchovies already have. With the beater arm firm on the glass bottom, start beating and do not move the arm until it has emulsified, then you can stir and to finish integrating all the ingredients. The result is a fairly light sauce without becoming liquid. If you prefer it thicker, add an egg yolk (they´ll be two then) and you´ll get a kind of mayonnaise with all Caesar´s dressing flavor. Keep it aside until the Salad is serve.
  5. Into a salad bowl put the lettuce, the tomatoes, the crabsticks, the corn, the chive and one of the anchovy fillets finely cut (keep the other one to decorate). Mix all very well. Serve two individual dishes, add the chicken and cheese. Incorporate some dressing, add the croutons in the very last moment in order to do not wheat the bread and they still crunchy. Fill a sauceboat with extra sauce and put it on the dining table.

Ready! Enjoy this salad and add it your favorite ingredient. While I prepare another fresh summer salad, stay around here and take a look to this Cold beet soup.

El blog de la alimentación y cuidados naturales

Intercambio de información e ideas sobre una alimentación y cuidados personales respetuosos de nuestro cuerpo y nuestra mente.

Luis Perrone Chef

La cocina de Perrone Luis

sarde e finocchietto

le ricette di casa mia

COMIÉNDOSE EL TIEMPO

Afila tus cuchillos

El Caldero Viajero

Come bien. Viaja a menudo.

Consejo Nutricional

La salud a través de la alimentación y nutrición

Jono & Jules do food & wine

Two food and wine lovers in Dublin.

Comer es Vivir

"Que el alimento sea tu mejor medicina y tu mejor medicina sea tu alimento"

La cocina de ama

blog de comida casera

dulcedelimón

Recetas caseras para sorprender