Archivo | Starters, Appetizers RSS feed for this section

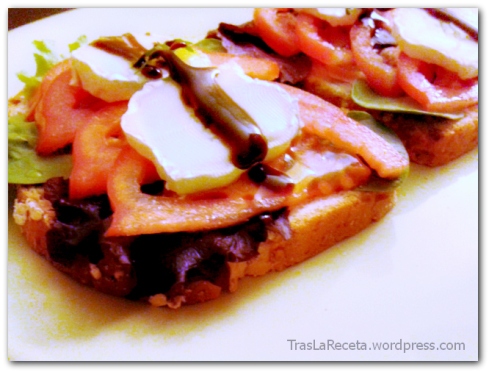
Tomato and goat cheese tostas

31 Ene
Todos los derechos reservados por Tras La Receta

All rights reserved by TrasLaReceta

Today is Friday, the favourite day of the week for the most of the people because it announces the weekend. And precisely because it is weekend I want to share with all of you a simple, healthy and quick recipe, Tomato and goat cheese tosta, ideal for a light dinner, or for a generous starter of a great St. Valentine’s dinner, for example. Keep this idea if you already are looking forward to surprising your better half in that special day.

The best of these «tostas» it is that they cook up in a short time. Although I present the ingredients that I used, you certainly could make your own adaptations. These «tostas» actually  are my idea to share with our friends or our families. Not only do I prepare them for a dinner, but also I make them for a delicious breakfast or just as a snack. You decide how to taste them. No more explanations, let’s go into the kitchen in order to prepare this simple recipe as soon as we pronounce them.

Ingredients to prepare Tomato and goat cheese tostas (4 persons)

4 slices of seed bread
2 ripe tomatoes
tender shoots’  mix
8 slices of goat cheese
extra virgin olive oil
Modena’s balsamic vinegar cream
salt

All rights reserved by TrasLaReceta

All rights reserved by TrasLaReceta

How to prepare Tomato and goat cheese tostas

  1. Toast lightly into a pan the bread slices with an olive oil’s trickle. You also can use a toaster and putting the olive oil at the moment to form our tostas.
  2. Put the toasted bread slices into a dish, add some tender shoots, now some tomato slices previously cut into fine half moons if the tomatoes are large enough. Add a pinch of salt.
  3. then, incorporate two goat cheese slices for each tosta
  4. finally, add a thread of olive oil and another thread of Modena’s balsamic vinegar cream above all.

Ready! You’ll check how tasty these simple tostas can be. Go on if you want make your own versions. Use the bread you like most, change the tender shoots for lettuce leaves, spinach or canons. If you are not kind of goat cheese, try with your favourite. A red wine, a good company and these tostas taste as you were in the glory. Happy week to all my followers and readers.

Breaded eggplant: easy and healthy recipe for oven

11 Sep
Todos los derechos reservados por Tras La Receta

All rights reserved by Tras La Receta

The eggplant is one of these vegetables I choose once and more because, besides I love it, it is ideal accompaniment for uncountable preparations. One of my favorite ways to cook up eggplants is fried and crispy, but I avoid to make it in that form because it absorbs more fats. It is actually a pity that we have to step down the frequency we eat it in this way. For this reason, the last time I prepared eggplant I tried with breaded slices with cheese that I baked into the oven. The result was a crispy, tasty and healthier course.

Present in the human diet for 4000 years, the eggplant has some other common names in English: aubergine in British English, and also brinjalbrinjal eggplantmelongenegarden egg or guinea squash. Today, edible varieties are protagonist in the culinary culture around the world. We can find it in the Greek Mousaka, in the Arabian Baba Ganoush, in the Italian Caponata or Parmigiana, in the Catalan Escalivada and many other.

Although I´m pretty sure you´ll love this way, I´m gonna give you a tip just in case you consider frying eggplant anytime. If you put the eggplant into a bowl with salted water during 24 hours, you will get frying the pieces without extra fats. Why does it happen? Simple: the eggplant  pulp is full of air and it´s cavernous. When it is soaking, the water covers all this free space inside the pulp and later, when you fry it, the oil won´t be able to being absorbed. So, if you want frying eggplant, no matter if it´s breaded or not, put the slices into water with salt. Now, lets try our today´s recipe.

Todos los derechos reservados por Tras La Receta

All rights reserved by Tras La Receta


Ingredients:

1 large eggplant

1/2 cup of breadcrumb

1/2 cup grated cheese

1 tsp dried oregano

1 tsp dried thyme

1 beaten egg

pepper

salt

How to prepare Breaded eggplants: recipe for oven (2 persons)

  1. Mix the breadcrumb and cheese, the thyme and oregano into a dish. Beat the egg into another dish with a pinch of salt.
  2. Wash the eggplant and cut it into transversals slices. Season them with salt and pepper.
  3. Pass every slice by beaten egg pricking it with a folk and later pass it by the breadcrumb and cheese mix. Put them into an oven bake previously covered with baking paper. You can put them directly into the oven bake lightly painted with oil.
  4. Bake between 170 and 180 Celsius degrees during 12 to 15 minutes, depending on every oven. When they golden, prick  in order to check they are cooked.
  5. Take away from the oven and serve immediately with tomato sauce and mayonnaise, or enjoy them without those complements.

    All rights reserved by Tras La Receta

    All rights reserved by Tras La Receta

As my followers will have noticed the most of my recipes are thought for 2 persons, but the most of them, as well, are easily comprehensible. The ingredient´s adaptation is quite simple; just double the necessary amounts. Just one more tip for our today´s recipe: If you decide to prepare 2 eggplant for 4 persons, bake them in two different moments. You´ll see, a very easy, simple, economic and healthy recipe. Enjoy them!

Morcilla´s burger: from the original recipe posted by Gastronoming

5 Sep
Todos los derechos reservados por Tras La Receta

All rights reserved by Tras La Receta

Some time ago I read a recipe of blood sausage burger that I fall in love with. I cooked it up as soon as I could, and today a present here an adaptation from the original that you can see HERE. My own proposal consist in a burger with blood sausage (Morcilla de Burgos) and boiled rice seasoned with extra onion and garlic, plus a touch of cumin, coriander and black pepper, instead of mincemeat. The effect was smoothing out the unctuous blood sausage´s texture and flavor.

I substituted the apple chips, certainly delicious, by a lettuce salad with tomato, onion, bacon and apple. Instead of Cheddar cheese (that is more commonly use for burgers) I chose Havarti cheese this once. At cooking moment I preferred to bake the burgers instead frying them, because in this way I avoided breaking them. If you prepare this burgers you´ll see the texture is a bit different from a meat one, but with a little care you won´t have any problem.

We are only two persons at home and we cook up morcilla´s burgers for six, so we could enjoy them in the classical way with the always yummy bread, but also I presented them like «tapas» (traditional Spanish appetizers) with a very cool beer. I have many ideas fluttering into my head since this blood sausage burgers gave me the light. I´ll share them as well later or earlier :). Now, let´s start with our Morcilla´s burguer.

All rights reserved by Tras La Receta

All rights reserved by Tras La Receta

Ingredients:

2 morcillas de Burgos (traditional blood sausage made with rice, from Burgos, Spain)

1/2 cup non boiled rice or 1 1/2 cup boiled rice (middle grain rice)

2 1/2 onions

2 crushed garlic cloves

1/2 tsp cumin

1/2 tsp ground coriander

1/2 tbsp parsley finely cut

black pepper

salt

2 tbsp extra virgin olive oil

1 egg yolk

4 tbsp breadcrumbs   


How to prepare Morcilla´s burguer

  1. In first place, cook the rice but do not wash it and put a little more of water than you usually use in order to get a creamier rice.
  2. Put the olive oil into a pan, heat and add the mashed garlic and the onion half with a pinch of salt.
  3. Once the onion transparences removed from the heat. Add the cooked rice, stir very well, check the salt and let it cools.
  4.   Remove the morcilla skin, put their meat into a bowl and proceed to break them completely until you get a morcilla´s mince. Then add the rice and the rest of seasons: cumin, coriander, parsley and pepper. Mix very weel. Now incorporate the egg yolk and the breadcrumbs and stir once more very well.
  5. It is time for giving form the burgers. Here you will see how I do it, although it´s a different recipe the proceeding is the same from number 4 point.
  6. Put the burgers into a lightly greased oven dish and bake 180 Celsius degrees during 10 to 12 minutes.
  7. Take it out, let refresh and serve the burger in the classical way with bread, mayonnaise and caramelized onion or in the way you prefer.

Notes: At moment of saving the burgers before cook them put between them some baking paper in order to avoid they paste each other and break them later. Keep them into the fridge while you´re patiently cooking the caramelized onion. How? Cut the onion into finely julienne or finely rings.  I did it with a sharp knife but I cried a whole river. It seems a lot of cut onion but you´ll see, at the end, the amount makes us laughing.

Put the onion into a pan with three olive oil tablespoon and a pinch of salt and let it cook very slowly during one hour. It seems an eternity but it worth it. You don´t need add sugar contrary it´s use to think, just cook it softly and without hurry and onion will be able to make explode all its sweetness.

Choose an appropriate palette spoon to take out the burger from the oven dish in order to not break them. If they lost their form a little, never mind, give they form again over the bread or dish. Simply a cheerful experience for taste. Thanks a lot Gastronoming for sharing your recipe :).

Patatas revolconas, Spanish recipe

2 Sep
Todos los derechos reservados por Tras La Receta

All rights reserved by Tras La Receta

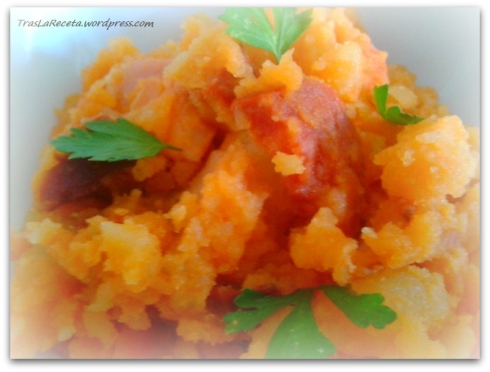
No matter where they´re from, Extremadura, Ávila or Salamanca, the «patatas revolconas» are one of those traditional Spanish recipes that when you try them, you will always want enjoy over and over. Despite its humble origin (it was food of Castilian peasants) it is a recipe that with just a very few things, basically potatoes, paprika and some meat product, the result surprise us because of their texture and flavor´s delicious combination.

The recipe, that has jumped from the Spanish countryside to bars, cafeterias and restaurants, in towns and cities, it has became popular and evolved. Although the ingredients that they add can be different, bacon, chorizo and «torreznos» as the most common of all, this recipe´s base is always the same: boiled potatoes they become pure, seasoned with paprika and enriched with some of the products I mentioned before. This is the reason of the names it acquires: patatas meneás, patatas revueltas or revolconas.

Todos los derechos reservados por Tras La Receta

All rights reserved by Tras La Receta

Ingredients:

6-8 potatoes

1/2 large traditional spicy chorizo

6 slices of bacon

1 garlic clove finally cut

1 tsp sweet paprika (Pimentón de La Vera)

1 tbsp extra virgin olive oil + 1 more optional

salt

parsley to decorate

How to prepare Patatas revolconas (4 persons)

  1. Peel the potatoes and put them into boiling water with salt. Let them cook very well until they broken if you prick them.
  2. Fry the chorizo and bacon into a pan. Once fried, take them out and put aside. Saute the garlic into the oil liberated by the chorizo and bacon. Put olive oil if it were necessary. Once the garlic golden (take care it doesn´t burn) take the pan out of the heat, add the Pimentón de La Vera and stir.
  3. Now back to very low heat, incorporate the potatoes to the pan and squash them until you get mashed potatoes, but let some pieces of potatoes. Add some water of the boiled potatoes if it were necessary.
  4. Put the chorizo and bacon we had aside into the potatoes, stir and serve.

    All rights reserved by Tras La Receta

    All rights reserved by Tras La Receta

It´s a course that´s served hot usually on winter, but if there´s some warmth yet, let it refresh and accompanies with cold beer. As main course, starter or appetizer, it´s actually good in any time. Enjoy and, you know, if you decides to travel to Spain, to Extremadura, Avila or Salamanca, don´t let try this Patatas revolconas.

Italian Spanish omelet

30 Jul

This post is a tribute to Spanish and Italian cultures. A tribute to the richness and variety of the Mediterranean diet. Some time ago, in a comment I share in a friend blog, I promised a recipe of Spanish omelet with pizza flavor, Italian style definitely. I´m sure I´m not the only one who have thought in that. So at home we love potatoes omelet, I´m always reinventing it. Another stuff we enjoy as well is pizza; if it is made in home, much better.

This last weekend I had whim of both. As I hadn´t enough time and disposition, I must admit, to prepare a pizza mass, I preferred cook up a Spanish omelet with an Italian dressing that let my «pizza cravings» satisfied. With a little of cheese, herbs and tomato you get that special flavor, the rest of the main ingredients are eggs and potatoes. Just a few ingredients and we´ll able to cooking up a luxury appetizer to share with our friends, taste with a beer or even having lunch or dinner.

All rights reserved by Tras La Receta

All rights reserved by Tras La Receta

Are you keen on the idea? Then, let´s cook it.

Ingredients

2 large potatoes

4-5 eggs

3 dried tomatoes previously rehydrated

4 tbsp grated Grana Padano cheese (Parmesan)

1 slice Mozzarella cheese finally cut

1 tsp dried oregano (a little more to crown)

1/2 tsp dried peppermint (a little more to crown)

garlic salt (you can use dehydrate ground garlic or a crushed clove garlic)  

cherry tomato

arugula or rucola

olive oil

salt

How to prepare Italian Spanish omelet

  1. Put the dried tomatoes into a cup of water during 15-20 minutes  in order to rehydrated them.
  2. Peel and cut the potatoes into thin slices. Fry them into enough oil until they soften and start golden (no pretty golden). Take them out and put over absorbent paper. Season them with garlic salt or normal salt. You can cook the potatoes into a roasting bag suitable for microwave. 6-8 minutes highest potency.
  3. Beat the eggs, season with garlic salt or normal salt (do not abuse if you´ve already put enough salt to the potatoes), add the oregano and the peppermint, beat a little more to integrate all, incorporate the potatoes and crash them with a fork until you get smaller pieces of potato (this is how it does cook up the authentic Spanish omelet) . Add the grated cheese and the Mozzarella slice into little pieces (remember put aside the other slice to crown), and for last incorporate the rehydrated dried tomato, finally cut. Mix all.

    All rights reserved by Tras La Receta

    All rights reserved by Tras La Receta

  4. Put 2 tbsp olive oil into a nonstick pan or the same oil where you fried the potatoes. As soon as you incorporate the mix, stir a little with a wooden spoon (do not be afraid you won´t get scrambled eggs). Let the omelet cook covered, low heat, in order to cook very well until it start bubbling. Check, moving the pan, the mix of the omelet is thickened: it is the moment to turn it around. How? It´s very easy ended: carefully detach laterals, take a dish or a top larger than the top pan, cover it, turn around take back the omelet into the pan. No matter if you leave some egg into the dish or top.
    All rights reserved by Tras La Receta

    All rights reserved by Tras La Receta

    All rights reserved by Tras La Receta

    All rights reserved by Tras La Receta

  5. Add the Mozzarella slice we got aside, cover it once more, let 2-3 minutes more cooking until the cheese melted whereas omelet cook. Take off from the heat.
  6. Serve the omelet on a dish garnish with cherry tomatoes and arugula or rucola and sprinkle with oregano and peppermint.

    All rights reserved by Tras La Receta

    All rights reserved by Tras La Receta

Ready, here you have another way to prepare potato omelets. This once I didn´t use onion, but you can include it. If you are going to do it, before add it to the beaten eggs you must fry it. Look at this Tortilla de Patatas, that I shared no long time ago. Enjoy this recipe with friend and family. Best regards and happy week beginning.

Rucola or arugula salad with watermelon and toast sunflower seeds

27 Jul

It is already weekend and maybe it´s all right for you get into the kitchen, but you´d prefer spend less time than you usually spend. Because of this, today I want to share a salad recipe, a very easy and fast recipe you´ll be able to prepare in a few minutes and enjoy as well. I won’t extend in a long article this once, just mention that here in Spain, during this portion of the hemisphere’s summer time, we have melon and watermelon everywhere. It is now when these fruits are much tastier and in their best moment to consume.

In the majority of bar and restaurant menus in the Iberian Peninsula it is prepare a tasty typical dish, melon with Serrano (Iberian) ham, that you should try if you come here to visit these lands. High water content and just few sugars, the watermelon (today protagonist) is ideal to include on a weight loss or weight control diet; it´s ideal as well in order to introduce more fruits and vegetables into a healthy life´s style. Watermelons are natural source of vitamin C and Lycopene, this last one, we already know its remarkable role in the fight against cancer.

Todos los derechos reservados por Tras La Receta

All rights reserved by Tras La Receta

Ingredients to prepare Rucola or arugula salad with watermelon and toast sunflower seeds

1 Roman lettuce

1 handful Rucola or arugula

1 large slice watermelon

1 red onion (small size)

1-2 tomatoes

2-3 tbsp toast peeled sunflower seeds

4 tbsp fresh beaten cheese

1 thread reduction of Pedro Ximénez vinegar (optional garnish)

Vinaigrette:

2-3 tbsp Balsamic Vinegar of Modena

2 tbsp extra virgin olive oil

salt to taste

How to prepare Rucola or arugula salad with watermelon and toast sunflower seeds.

  1. Wash, dry and cut into julienne the Roman lettuce. Put it on salad bowl and add the arugula or rucola, the red onion julienne, the tomatoes into fines half moons.
  2. Put into a cup vinegar, olive oil and salt to taste. Mix very well. Add a little of the dressing to the salad and stir.
  3. Incorporate the watermelon dices and the half of the sunflower seeds.
  4. Serve into individuals dishes and crown with 1 tbsp fresh beaten cheese. Put the rest of the sunflowers seeds and a threat of Pedro Ximénez vinegar reduction.

    Todos los derechos reservados por Tras La Receta

    All rights reserved by Tras La Receta

It is ready! You can put the vinaigrette at the end, dressing with vinegar and olive oil separately on rough guess. A light recipe you can prepare as a menu starter, to accompany meat, fish or pizza, or simply to have light lunches or dinners. Would you like to see which other dishes combine with this salad?  Then click here.

Cold beet soup: light recipe

23 Jul

The hottest summer´s month bring with them, besides the necessity of having fresh and lighter lunches and dinners, wishes of less permanency inside our kitchens. Because of this today I want to share a recipe that will let you spend just a few minutes of preparation and a lot of free time to enjoy it. It´s a recipe that I invented after reading a proposal from Azafrán y Pimentón, blog that I follow, where you´ll find delicious starters or main courses.

This cold soup takes less bread and oil for those who are following any diet, either weight loss or weight control, the beet is an excellent ally if you are under any of these plans. Besides satiates and contains lot of fiber that avoid constipation and favor intestinal transit, beets avoid liquid retentions as well. It´s figured out that people who frequently eat beet have less probabilities of developing some malign tumors, especially if beets are consumed raw. Also they have antioxidants proprieties that become bees natural producers of cells and red bloods, thanks to their high levels of iron and folic acid.

If we introduce beets into our diets, our health in general will improve, and ours skin, hair and nails will take more vitality and shine. This is because of the methionine, an amino-acid present in this food that favors the secretion of hormones like the dopamine, who has the function that we live in a better mood, and if we are in strict plans that we can take them to a happily ending.

To counteract possible damages to people who are week kidneys, I opted for a cook beets. I mix them with a beaten fresh cheese, enriched with calcium, that neutralize the oxalates, agents so prejudicial to kidney diseases or gout. It is advisable the moderate consume of beet to these pacients, but they can take it if is accompanied of products rich in calcium.

One last point: Hypertensive people also should have special care eating frequently beet. This edible root is very rich in sodium, if it´s true has high levels of potassium that use to neutralize the extra amounts of sodium. As I always say, taking one food or another won´t  hurt us, on the contrary, a varied and balanced diet will provide us with more nutrients to supply all the requirements of our organism, and we´ll be able to live more healthy.

Todos los derechos reservados por Tras La Receta

All rights reserved by Tras La Receta

Ingredients to prepare Cold beet soup (4 persons)

450 gr cook beets

1/2 cup (100 ml) tomato juice

120 gr beaten fresh cheese 

2 slices whole-meal bread

1 clove garlic (to taste)

2 tbsp olive oil

salt

Todos los derechos reservados por Tras La Receta

All rights reserved by Tras La Receta

How to prepare Cold beet soup

  1.  Soak the bread with tomato juice y and oil.
  2. Cut the cook beets into cubes and add them to the wheat bread.
  3. Add the garlic and a pinch of salt. Ground in a blender  until the ingredients have integrated. Check the salt to taste.
  4. Incorporate the half of the fresh cheese, blend again. Save it on the fridge. Is has to be very cold when you serve it.

    Todos los derechos reservados por Tras La Receta

    All rights reserved by Tras La Receta

Serve in bowls and add the other half of the fresh cheese. I have to clarify that the result is rather thick, even if the name soup could seem the opposite. If you like  could soups or creams, you will love this. It is very easy to make as you will have seen.  It´s an excellent option to the hot summer nights. I hope you enjoy it as much as I did.

Would you like to see another cold soup? Then visit this link.

Stuffed potatoes: the Cuban recipe, step by step

19 Jul

Today I want to  share a Cuban recipe, a classic on our mom’s menus, made of potatoes and mincemeat. I used to help my grandmother when she prepared them, no matter if the result were a little bit different of their perfectly round balls. I always insisted to eat the stuffed potatoes were prepared by myself, and I would enjoy so much elaborating them and later eaten them. I only participated at the moment of forming the balls, during the rest of the process I only used to watch and ask.

Todos los derechos reservados por Tras La Receta

Todos los derechos reservados por Tras La Receta

Ingredients to prepare Stuffed potatoes: the Cuban recipe (4 persons)

 5 potatoes

40 g butter (optional)

2  beaten eggs

bread crumbs for breading

250 g mincemeat

1 onion

4 crushed garlic cloves

1/2 red bell pepper

1/2 tsp dry oregano

1/2 tsp dry thyme

4 filled tbsp fry tomato sauce

2 tbsp oil

salt

black pepper

How to prepare Stuffed potatoes: the Cuban recipe

  1. Season the mincemeat with salt and black pepper to taste. Mix it with the crushed garlic, the oregano and the thyme.
  2. Heat the oil, add the onion and the red bell pepper, both finally chopped, leave them for a few minutes.
  3. Once the onion transparences incorporate the meat until it golden, then add the tomato sauce (you can use natural crushed tomato). Stir very well in order to integrate every ingredient with the mincemeat and let it cook for 8-10 minutes. Cook the meat with a cover if it is dry, if it has lot of liquid cook it without the cover.
  4. When the mincemeat has cooked, take it out into another recipient and put aside while we prepare the potatoes puree.

Keep in mind the stuffing should be more solid than in other preparations, because here the matter is make our work easier when we form the balls.

Let´s work our potato balls

  1. Cook the potatoes in boiling water with salt to taste for 10 minutes, depending on how large or small you have cut the potatoes.
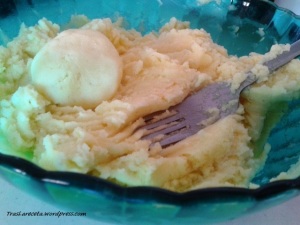
  2. Make puree, add butter or not, check the salt and let it refresh no cool.

    All rights reserved by Tras La Receta

    All rights reserved by Tras La Receta

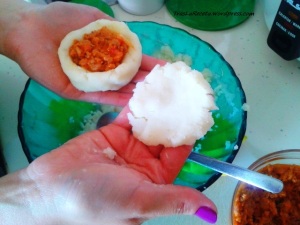
  3. Then, with help of a large spoon take first a portion, enough to form a ball, sculpt so that you make a hole in the centre in order to fill with a small spoon of our mincemeat.

    All rights reserved by Tras La Receta

    All rights reserved by Tras La Receta

  4. With the other hand take a smaller portion of puree, form a round layer and cover the filled ball, keep molding until you get a round ball, but don´t worry if it isn´t perfectly round at first time. Later it´ll catch a better form.
    All rights reserved by Tras La Receta

    All rights reserved by Tras La Receta

    All rights reserved by Tras La Receta

    All rights reserved by Tras La Receta

    All rights reserved by Tras La Receta

    All rights reserved by Tras La Receta


  5. When you have finished all the balls the puree has permitted to form (8-12), it is the moment to breading them: pass them first for the beaten egg with a pinch of salt and then for the breadcrumb . It is in this part of the process when you´ll see how your balls end taking the right form without bigger complications.
    All rights reserved by Tras La Receta

    All rights reserved by Tras La Receta

    All rights reserved by Tras La Receta

    All rights reserved by Tras La Receta

    All rights reserved by Tras La Receta

    All rights reserved by Tras La Receta

  6. Put them into the fridge at least for 10 minutes while you prepare a salad or any other accompaniment you prefer.
  7. Fry the potatoes in abundant oil (wait the oil heat very well in order to avoid the balls break). Once they golden turn around, let golden again and take them out.

    All rights reserved by Tras La Receta

    All rights reserved by Tras La Receta

Serve them with a salad of Roman lettuce, cucumber, tomatoes and red onion seasoned with a sweet mustard vinaigrette. It´s very easy: 2 1/2 tbsp mustard, 2 tsp honey, a trickle of Jerez Vinegar, 1 tsp extra virgin olive oil, a pinch of salt and pepper, all very well mixed until the ingredients blended.

If you decide to try this recipe, it´ll be better you do it in advance. You can prepare the mincemeat while you prepare the puree. Remember let the puree refresh but not completely cool. With respect to the breading, if the bread is very thin, sometimes it is necessary to repeat the breading, so later they will fry better and you’ll avoid they absorb more fat, even if this could seen paradoxical. And no more for today: prepare soon this recipe and tell me then. Happy weekend! 🙂

Cherries Salmorejo

11 Jul

If you liked Cordovan Salmorejo, then you´ll love this cherries salmorejo, whose recipe I came across surfing Internet. At this time, the recipe for gourmets is presented by Directo al Paladar. All the credit is for them. Perhaps, I hasn´t got the spectacular color of the original recipe (you´ll check this if you click the previous link) but the flavor is gorgeous, an amazing explosion for our taste.

Todos los derechos reservados por Tras La Receta

All rights reserved by Tras La Receta

Ingredients:

650 gr red ripe tomatoes
350 gr cherries
200 gr bread (day before)
1 garlic clove (I prefer just 1/2 one)
150 ml (3/4 cup) extra virgin olive oil
water to scald the tomatoes
salt

Todos los derechos reservados por Tras La Receta

All rights reserved by Tras La Receta

How to prepare Cherries Salmorejo

  1. Scald the tomatoes and leaves them ready to use. Click here and you´ll be able to see how easily we can do it.
  2. Remove the bone of every cherry. You can do it with a special tool or you can try with your own hands (it´ll be very easy if you use ripe cherries).
  3. Put the bread, the tomatoes, the cherries, the olive oil, the garlic and the salt into a container or into a blender vase. Blend as well as be possible. It won´t be necessary pass it through a Chinese strainer, but you can do it if you want.
  4. Leave the Cherries Salmorejo inside the fridge while you prepare a hard-boiled egg.

Just as we can do it with Cordovan Salmorejo, take it as an appetizer, as a menu starter or even as a light dinner substitute. Serve cold and garnish with diced hard-boiled egg and diced serrano ham.

Yummy, yummy!!

Salmorejo: Cordovan recipe

10 Jul

Last summer I made my first Cordovan Salmorejo (Salmorejo cordobés) thanks to the great explanation I found at Javirecetas website. I loved that simple but delicious dish that hereinafter appeased hot, thirst and hunger. This season, as soon as barely heat was felt, I went to buy some good red tomatoes in order to prepare the first Salmorejo of the summer. Now, pear tomatoes and tomatoes branch are in their very best moment.

The branch tomatoes are my favorites to prepare Salmorejo. I leave the pear tomatoes for our Andalusian breakfasts that we have every weekend, summer or winter, no matter which season be. The Cordovian Salmorejo is a very humble dish. It used to be prepared before Christopher Columbus brings tomatoes here from the New World. Because of this reason, before that, the Salmorejo used to be made just with vinegar, bread, oil and garlic, all perfectly crushed on a mortar. It was never on a court cook book. It was prepared and eaten by poor people and countryside people.

There are two crucial moments for Salmorejo as we know it today. When tomato is introduced and the Salmorejo takes the red color (before that it´s used to be a white cream or soup), and a second moment it was when the electric blender was invented. It replaced the anterior primitive process. Historical references claim that Romans and Arabians, each of them, made and consumed the white primitive Salmorejo, hot or cold. Today the identified recipe as Cordovan Salmorejo is a little bit different, but tasty, fresh and extended for all the Spanish geography.

Todos los derechos reservados por Tras La Receta

All rights reserved by Tras La Receta

Ingredients to prepare Salmorejo Cordobés (Javi´s recipe for 2-4 persons)

500 gr red ripe tomatoes
100 gr bread (day before)
1 garlic clove (I prefer just 1/2 one)
100 ml (1/2 cup) extra virgin olive oil
water to scald the tomatoes
salt

How to prepare Cordovan Salmorejo

  1. Scald the tomatoes and leave them ready to use. Click here and you´ll be able to see how easily we can do it.
  2. Put the bread, the tomatoes, the olive oil, the garlic and the salt into a container or into a blender vase. Blend as well as be possible. It won´t be necessary pass it through a Chinese strainer, but you can do it if you want.
  3. Leave the Salmorejo inside the fridge while you prepare a hard-boiled egg.

Take it as an appetizer, as a menu starter or even as a light dinner substitute. Serve cold and garnish with diced hard-boiled egg and diced serrano ham.

Yummy, yummy!!

El blog de la alimentación y cuidados naturales

Intercambio de información e ideas sobre una alimentación y cuidados personales respetuosos de nuestro cuerpo y nuestra mente.

Luis Perrone Chef

La cocina de Perrone Luis

sarde e finocchietto

le ricette di casa mia

COMIÉNDOSE EL TIEMPO

Afila tus cuchillos

El Caldero Viajero

Come bien. Viaja a menudo.

Consejo Nutricional

La salud a través de la alimentación y nutrición

Jono & Jules do food & wine

Two food and wine lovers in Dublin.

Comer es Vivir

"Que el alimento sea tu mejor medicina y tu mejor medicina sea tu alimento"

La cocina de ama

blog de comida casera

dulcedelimón

Recetas caseras para sorprender